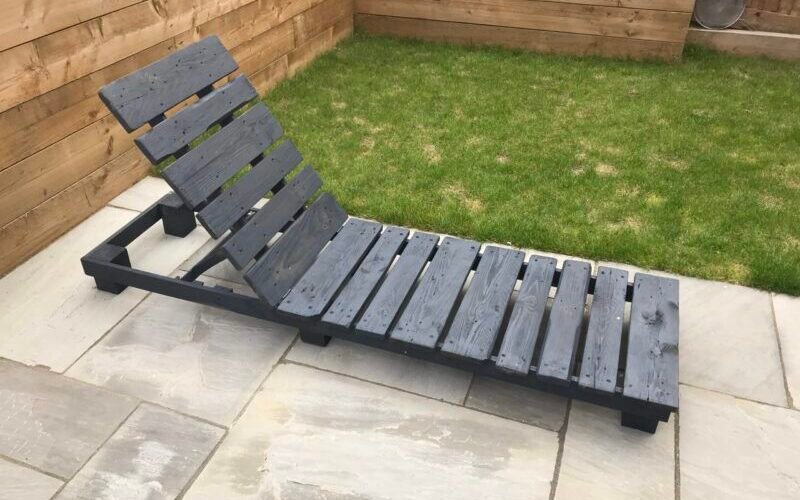
Creating your own Sun Loungers with some pallet wood can be an easy and enjoyable way to relax in the summer, follow the steps below and enjoy the sun in your garden.
Table of Contents
ToggleMaterials Needed
- Pallet Wood
- Wood Screws
- Bolts, Washers and Nuts (For the reclining part)
- Hinges (For the reclining part)
Tools Needed
- Drill
- Saw (Circular or other)
- Sander (Or just sandpaper)
- Clamps (Optional)
- Square (Make sure things are square or else it might break with the weight)
- Tape Measure
- Wood stain or paint
- Paintbrush or roller
Step-by-Step Instructions
1. Base
If you have a big pallet of 2.4 meters you can use those boards for the long parts, if not, you can use smaller ones and attach in the middle with the legs.
Select 6 of the pallet pieces of wood that hold the top and bottom of the pallet and place them in the 4 corners of your base, the other 2 place at the middle where the weights when you are seated will be (Mine has 120 cm from the bottom to the reclining part).
Cut the boards for your desired measure, mine are cut with below measures:
Length: 200 cm
Width: 50 cm (adding the 200 cm width, will get around 53.6 cm, which is smaller than the 60cm desired for the total width)
Make sure you sand everything before assembling to make is easier and have a smoother surface.
Add the pallet boards around the legs with screws to create the base (Make sure all is square).
2. Lower Part (Sitting Area)
Cut the pallet boards a bit bigger then the width of the base (Mine are 60 cm) and lay them with screws until 2/3 of the length (Can be adjusted, depending on how much area you would like to recline, again, mine has 120 cm).
3. Top Part (Reclining Area)
Measure the area and cut to thinner boards a bit smaller than that length (Check next steps to find the right measures without overlapping), this will be the support for the horizontal boards to be screwed at the reclining part. Cut the remaining horizontal boards and attach all.
4. Hinges
Attach the hinges between the bottom and top part, test to make sure it moves ok and sits flat at the base.
5. Reclining Mechanism
You will need 3 smaller boards to support the chair when not fully reclined, also, you will need 2 additional boards attached to the sides of the base to support the reclining part and allow different levels of reclining.
Once you are happy with the measures, attach the bolts, washer and nuts to secure the boards and have the movement. (This consists of 2 boards parallel to each other and attached with the bolts to the thinner boards on the reclining part and one other board attached to those, this board needs to be almost the width of the base so it can stop at the different highs).
Cut some indentations on the support for the reclining part so you can choose different levels.
6. Paint or Stain
Once all is assembled and sanded, male sure all is smooth and supports the weight needed, it’s time to stain or paint the sun lounger.
Finishing Touches
Inspect everything to ensure all is secure. You can add a sealant for a polished look and to protect them from moisture.
Time to lay down and enjoy the sun with your new diy sun lounger.
If you have any questions or want to share your DIY sun lounger, send me a message and if I get a lot of requests, will add a video explaining the whole process.